The Refashioners 2015 – Me (gulp!)

Aaaaand here we are! Unbelievably, at the end of an entire month of refashioning inspiration and…lets face it….more than a little genius thrown in for good measure! Helloooo again everyone! Feel like I haven’t seen you for aaaaaages!!
The trouble with organising an event like this is that, as the host, there’s an inevitable weight of expectation. Real or imagined. Actual or self imposed. Playing alongside this line up of talent is mildly intimidating. I can’t lie! But “comparison is the thief of joy” so let’s be real and stay true to ourselves. I’m not a couture technique kind of gal. Â Never will be. I like simplicity. Both in terms of process and the finished garment. If I churned out something amazingly clever that just wasn’t me and I would never wear, you guys would know in an instant. Â Trying to be something I’m not is not really my bag. So true to form, here’s a simple but oh so effective little refashion for you…..(secret squirell…..shhhh…..I actually really love this….just because it’s easy…don’t mean it doesn’t count, ha ha!)
Ever noticed how an oversized man’s shirt, when worn, has the perfect armhole size, dropped shoulder and wide sleeve configuration for a kimono jacket??! That was my starting point….

This shirt had been sat in my stash for months. Even before my first email went out about this series. I think it was originally intended for a magazine article. But I ended up taking a different direction so it sat there. What I loved about this shirt was it’s size. Lots of fabric to work with. It’s colour. I love a versatile neutral. and last but not least, the fabric. Not easy to photograph, but it’s medium weight and drapey with a very slight sheen.

I started by removing the pocket. Often the biggest obstacle in a shirt refashion is having a pocket when you absolutely don’t want one. Luckily I managed to all but vanish the stitch marks using this technique.

Next, cut all around the button bands and collar to remove…

Stay stitch the neckline so it doesn’t distort as you work. If you’re like me and do lots of trying on and test pinning as you work out what you’re going to do (I tend to work things out on the fly rather than have a plan) then stabilising that neckline curve is a 2 minute job that’s well worth doing…
Here’s how it looked at this stage. (I actually quite like this shape too!) But I continued…

Fold up your shirt along the length, lining up the shoulders and armhole curves…

This enables you to cut both sleeves equally in one go. I cut mine just below the elbow…

I reviewed the shape and proportions at this stage and decided on my next steps…

Lop off the shaped hem to shorten and create a boxier hemline…

Take a line from the shoulder point/neckline curve right down to the hem….it’s a gentle diagonal in this pic…but you could also go straight down at right angles. Either will work.

Mark a cutting line on both sides (eyeball if you’re brave…but I had a rep to protect on this occasion, lol!)…

And there you have your basic kimono shape. Just the neckline, hem and sleeves to finish…

Enter “donor” shirt number two! I had a moment of panic here. The stuff that I had planned to use for the kimono bands didn’t work out ( it was the remnants of this top and the combo really worked but in truth I bodged it!!) and I had nothing left in my stash that worked. So I nipped out to the local charity shop 10 minutes down the road and bought this one!

I pieced a band from the sleeves, interfacing the pieces before I joined them….you’ll want the finished band to be about an inch shorter than the neckline/opening or your jacket so measure accordingly…if you want a less structured, more fluid lapel, you could try skipping the interfacing. Which I may try next time.

Folded in half , RS together, the ends sewn, then turned through and pressed. (use a point turner or knitting needle to get those corners crisp) I had my neckline band…

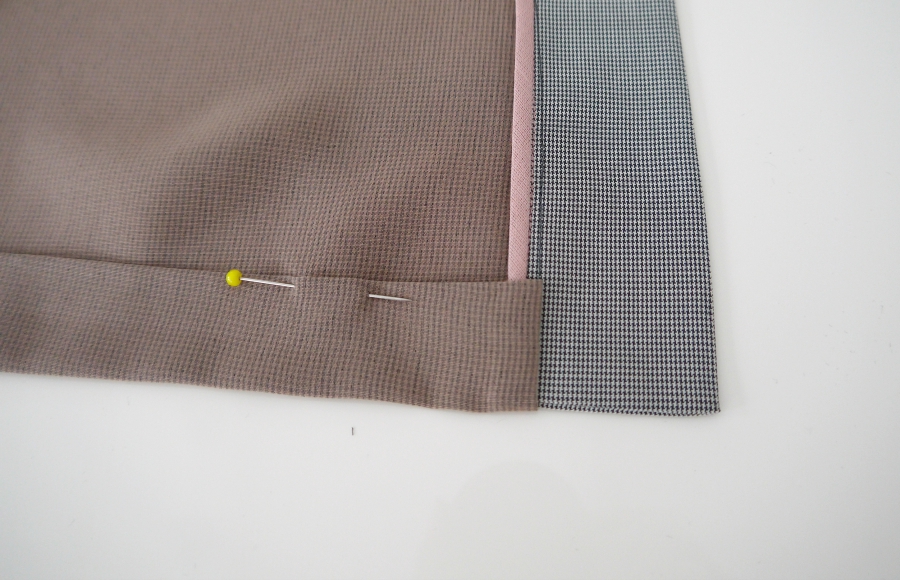
Two important steps before applying the band. First press up the raw edge of the bottom hem by about half an inch.
And notch into that neckline curve…up to but not through the stay stitching.

Baste or pin the band all the way around the RS of the neckline and opening like so. It’ll need a little bit of easing on around that notched neckline curve…

When you get to the hem part flip it over like so. Â The WS of the hem flips over to the RS and encloses the bottom of the neckline band like so. (Ignore the extra seam allowance of the shirt fabric on the right. I was just playing with the placement a bit)

Sew right to the end of your hem fold like so and backstitch to secure…(I know this looks a bit odd if you’ve never used this technique before…but bear with me. It will make sense in a moment)

I trimmed and bound my raw edges at this stage. I didn’t take the bias tape all the way down to the end. Because we’re going to turn that through in a minute and I didn’t want the extra bulk preventing a nice sharp corner….

So here’s where we are at. This is the outside of the jacket. Looks a bit odd I know…
But look what happens when you turn that corner RS out 🙂 Creates a lovely clean finish. 
Here it is from the outside. Simply hem along that line where the pin is, and up to the seam where the band is joined to secure the hem allowance.

Here’s where we’re at…

Measure the sleeve opening….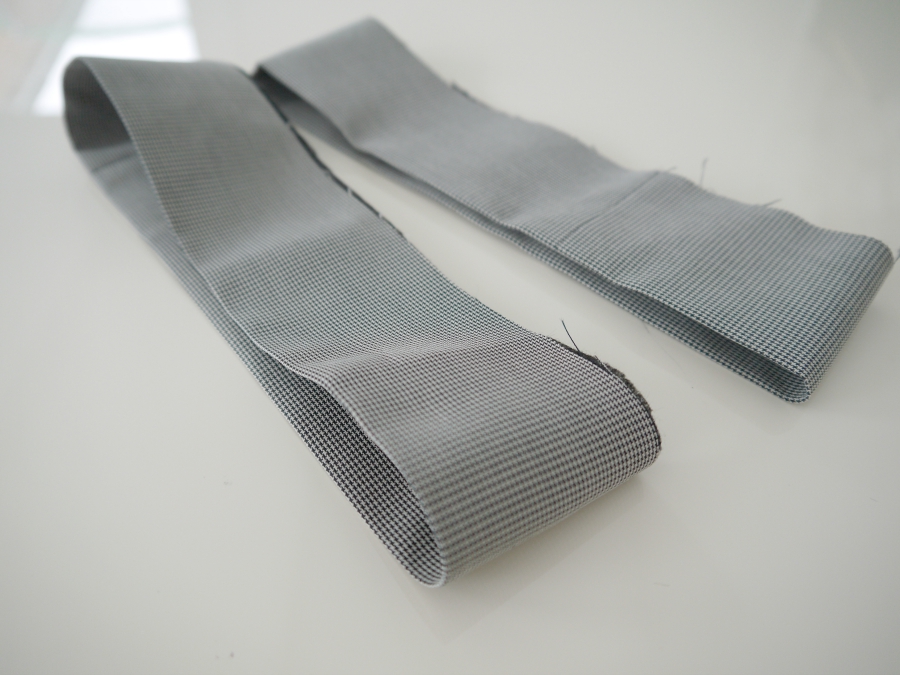
Create matching cuffs!
Baste/apply…
trim, bind, turn through, press everything…alot…
And you’re done!! Simples!


And that’s it! Our job is done for another year and now it’s over to YOU!! Grab a shirt, get refashioning, share it, and be in with a chance of winning that awesome prize. Now worth just under £700!! Jaw dropping right?! We’ll be sharing a selection of your refashions right here throughout Sept and there’ll be inspiration posts to give you even more ideas and directions in which to go with your shirt refashioning. You have until 27th Sept to submit yours.Â
I’d like to take this opportunity to thank all of the talented stitchers who shared their ideas with us this August. I for one, have a much longer sewing queue than I did at the start of August; there are so many ideas I want to try out!! Love and hugs and much gratitude to everyone involved. Phew…that’s it…we are done!
What now?
Over to YOU….show us what ya got!