Serger Series – Part 3: Nailing Tension

Loopy stitching and puckered or curled fabric edges be gone! It’s time to nail the whole tension thing once and for all! The best way to diagnose a problem when it crops up is to understand the effect that the various tension settings have on the various threads that form your overlock stitch; and the best way to do THAT is to sew a sample swatch for each one. Â Yes there are more fun things to be doing like actually making stuff! But this is a one time task which, once you’ve done it, will give you the means to diagnose problems, and put them right, quickly and easily without any of that “why the HELL is it doing that?!! kind of frustration. So that’s gotta be worth it, right?!! If nothing else it will save your loved ones from putting up with the “effiing & blinding/cussing” coming from your general direction (I KNOW that’s not just me!)

So. First things first. You’ll need to thread each needle and looper with a different colour thread. (If you can match it to the colours in your threading diagram even better! Threading guide here if you need it) Â This will aid in identifying which thread is doing what, the effect it has on other threads and generally help to differentiate.

This is what the aim of the game is. One swatch for each needle and looper with each swatch containing samples of the stitch at each tension setting. At the end of which you’ll be able to mark the optimum tension settings (and ratios) for each thread. I’ll explain further along how this is useful as you might well be thinking that working out your tension on calico is pointless when you’re sewing predominantly with knits &Â possibly a whole variety of fabrics…but bear with me. It does make sense I promise!

So for the swatches I used simple calico. Just because it’s plain, medium weight, I had some, and I could draw on it easily and permanently. If you have other fabric that fits that criteria, fab. Use it. You’ll also need a ruler, biro/pen and fabric scissors…

Cut 4 strips about 8″ wide (one for each tension dial) and long enough to accommodate a 1.5″ section for each of your tension settings plus a header. So basically, my serger has tension settings from 1-9. So I divided each strip into 10  x  1.5″ sections.

Fold/press in half along the length. Then at the top of each one write the name of the thread/section you are swatching (so…left needle, right needle, upper looper, lower looper) and the colour of the thread that you have used for that section. (I also added the number that corresponds to that section on my threading diagram. But this isn’t that necessary. Call it thoroughness overkill on my part!) Then write the numbers 1-9 down the left hand side of each strip….
So the process is the same for each swatch. Start with all dials at a medium setting of say 3 or 4. Something that you know will give you a basic overlock stitch without being ridiculously loose or tight. Just set them all the same. Then “swatch” each tension dial in turn as follows. Left Needle, Right Needle, Upper Looper, Lower Looper. (So basically left to right on your tension dials).
Starting with the left needle, set the tension dial to 1…
…then serge down the right hand side or your swatch fabric until your needles hit the line. Stop.
Move the tension dial to 2…
Serge until your needles hit the next line…
Stop.

Set your tension dial to 3…

Serge until your needles hit the next line and stop.

I suspect you’re getting the gist now! Keep moving the tension dial up one increment at a time…

…and sewing up to the next line…until you’ve swatched each tension setting on that dial. At that point, examine the stitch and mark the tension setting that gives you the best, most balanced stitch. (more detail on what constitutes a balanced stitch further down, so bear with. We’ll get to that part) Set the tension dial at that setting. Leave it there, and move on to the next tension dial and repeat the process for that one. once you’ve established the optimum setting for the second dial, set it to that, and move onto the third, then the fourth…
So, by the time you’ve done all that you’ll end up with 4 of these! So, now what to do?
What these Swatches Tell You…
So how do swatches made on calico relate to sewing with knits? I might have gone to all this trouble to get a perfect stitch on a double thickness of calico, but the tensions will be completely different when I start sewing jersey, right? Welllll…yes…..and no! The numbers may be different but the basic concept of what these swatches tell me will be much the same, proportionately, whatever fabric I’m using. Firstly there’s the ratio/differential between each setting. From my swatches above you’ll see that  my “ratios” are 6-6- 4-3. (Don’t be surprised if this differs slightly from your manual’s recommended settings! Every machine is different.) So basically my needle tensions are the same as eachother, and my looper tensions are 2 and/or 3 notches lower than my needles. This rough relationship between the tension settings is my starting point with any other fabrics I now sew with. It’s a ratio that I now know, works. So when I sit down at my serger with a new piece of jersey, I might lower them all by half a notch, if my common sense tells me to do so, but generally my starting point is roughly the same.  It may be +/- half a notch or a notch, but in my experience (and I sew with mostly light or medium weight knits and wovens) there isn’t a dramatic deviation from those numbers or ratios even after I’ve done a test swatch on my fabric. Now, before I even start….I know I’m roughly in the right ball park!
The other thing these swatches tell you is why your overlock stitch or fabric is behaving in a particular way and allows you to identify where you might need to fine tune from your starting point. Take a look….
Left Needle  (Too Loose)
We’re looking at the BLUE thread here. (Ignore the rest) With the needle tension set really low, much as with a standard machine, the stitches will not sit flat on the surface of the fabric. You can see a little “daylight” between the stitches and the fabric here at the lowest setting. It’s not terrrrrrible but wait….
 On the reverse it’s waaaay more obvious that the tension on the blue thread is too low. See those little blue loops that gradually get smaller as you move from the left to the right of the image? IAs the tension increases the thread will sit more flush with the fabric. So if your left needle thread is looping at the back like that…increase the tension.
Left Needle  (Too Tight)
There’s alot more play and forgiveness in needle tension  than there is in looper tension in my experience. Especially at the upper/tighter end of the tension scale. The effect here isn’t quite as obvious on this calico as it might be on a fine tissue knit but at the highest tension setting (we’re still looking at the BLUE thread. Last segment. Left of the screen, numbered 9) you can see the fabric is starting to pucker ever so slightly…..

Maybe more visible on the reverse….see that slight dimpling along the stitch line and the way the corner can’t lay flat? It’s all just a little bit “tense” isn’t it?! So any sign of puckering along the stitch line, lower your needle tension.
Right Needle  (Too Loose)
This time we’re looking at the CREAM thread and the right hand needle. As I said, both my needles are always set at the same tension and the effect that having the tension too low or too high is the same….

Loopy means it’s too low. Increase the tension.
Right Needle (Too Tight)
This time, the blue thread has already been set to the right tension. We’re looking at the CREAM thread and on the highest setting it’s causing the same puckering that the blue thread did… look at the way the edge of the fabric on the far left is sliiiiightly wavy and not sitting flat….

See the way the corner is lifting, the sliiight wave to the fabric edge and that slight dimpling along the stitch line again? Same as before….reduce the thread tension.
So to summarise…needle tensioning on a serger is pretty much the same as on a standard machine. Check the underside as well as the top. If it puckers it’s too tight. If it loops it’s too loose. adjust up or down accordingly. Simple!
The Loopers
The loopers is where the “balancing the stitch” part comes in. The upper and lower looper threads form loops that loop round eachother and cover the edge of the fabric. Hence the term loopers, I’m guessing! To get a “balanced stitch” you want the part where the upper and lower loopers link together, to sit right on the edge of the fabric. We’re almost at that part; but first lets look at the way incorrect tensioning affects the upper and lower loopers interact with eachother. They have a co-dependant relationship if you like! If one’s not quite right then the other can’t do it’s thang!
Upper Looper (too loose)
We’re looking at the GREY thread in this pic. Having the upper looper  tension too loose allows the loops to float over and under the edge of the fabric…
To put it another way, the loops of the upper looper (grey), should be exactly the same length as the loops of the lower looper (yellow) and meet eachother at the edge of the fabric. If your upper looper thread is passing over and under the edge of your fabric like this, but not causing it to curl….it’s too loose. Increase the tension on the upper looper.
Upper Looper (too tight)
At the other end of the scale if the upper looper tension thread is too tight, it will make the grey thread loops too short/tight and pull the lower looper thread (yellow) round from the other side and curl the edge of the fabric in the process….

So if you have short loops on top pulling and curling the fabric around from underneath like this? Your upper looper tension is too tight.
Lower Looper (too loose)
We are looking at the YELLOW thread of my lower looper now. It’s the same interaction as before but the effect is reversed. If the lower looper tension is too loose, it allows the lower looper thread to float round to the top of the fabric rather than sit on the edge. You’ll notice this makes the grey upper looper threads too short in relation.
But there is no curl which means it’s a “looseness” problem rather than a “tightness” problem. Increase the lower looper tension.
Lower Looper (too tight)
With the lower looper tension set too tight the YELLOW thread (now no longer visible) is pulling the upper looper (grey) thread around and under and curling the fabric edge again, but this time it’s curling under….
Curling is sign that one oor other of your loopers is too tight. If it curls upwards it’s your upper looper. If it curls under, as it does here, it’s your lower looper. Lower the tension of the lower looper.
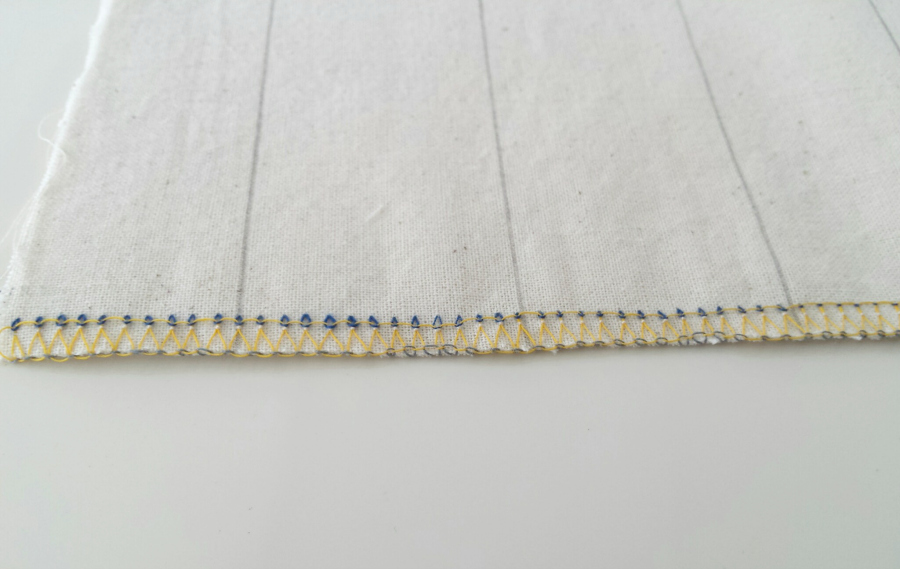
The “Perfectly” balanced stitch…
So this is what we’re aiming for. The holy grail of serging. The “perfectly” balanced stitch. Truthfully there’s no such thing as perfection, lol! But this is what to look for as you are deciding on the optimum setting for each swatch, and setting your tension for each new fabric.
Stitching lines (blue and cream thread) flat to fabric and not looping or causing puckers on either side. Upper Looper loops (grey thread) extend right to the edge of the fabric where they meet the Lower Looper loops (yellow thread) from the underside…

The lower looper thread from the underside view. Neat little “Y” shapes with just the teeniest bit of the blue and cream needle threads visible from the other side. The yellow “Y”s (lower loops) extend right to the edge of the fabric where the meet the grey thread of the Upper Looper loops….

….and finally that spot, right along the edge of the fabric (extremely tricky to photograph one handed!), but hopefully you can see both looper threads meeting and looping around eachother to enclose that raw edge. In essence, THAT is the perfectly balanced serger stitch.
The swatches give you a starting point at which you have a rough idea of the tension ratios of your machine. From there, Â you can diagnose problems with any given fabric, by looking at how it (and the stitch) is behaving and comparing it to your swatches. He’s a few “rules of thumb” I’ve discovered since getting to know my serger this way. Â In general if part of the stitch is loopy, then the tension is too loose. Â Loopy = Loose. Get it?! The swatches will help you identify which part of the stitch you are looking at and adjust the relevant tension dial. If the fabric edge is curling then one of your loopers is too tight. If it curls upwards it’s your upper looper. If it curls downwards it’s your lower looper. If there’s puckering along the length, then needle tensions are likely too tight.
So, with serger swatches in hand, the next time you sit down at your machine, hopefully there will be less cussing, and more beautifully balanced stitches 🙂
Questions?? Feel free to leave them in the comments section and I’ll do my best to answer!