The Refashioners 2013 – Marie of A Stitching Odyssey
When Portia asked me to take part in her challenge - The Refashioners – I was super excited, having watched in awe as the action originally unfolded in 2011. I said ‘yes’ immediately and then broke into a cold sweat later on when I remembered that I’ve never actually refashioned anything before…ever! So, how did I do?
Well, it certainly was a challenge for me, but a thoroughly fun one at that. At this point I really must thank Portia for taking my relative inexperience into account and not sending me something too scary…I don’t think some of the other participants got this lucky!
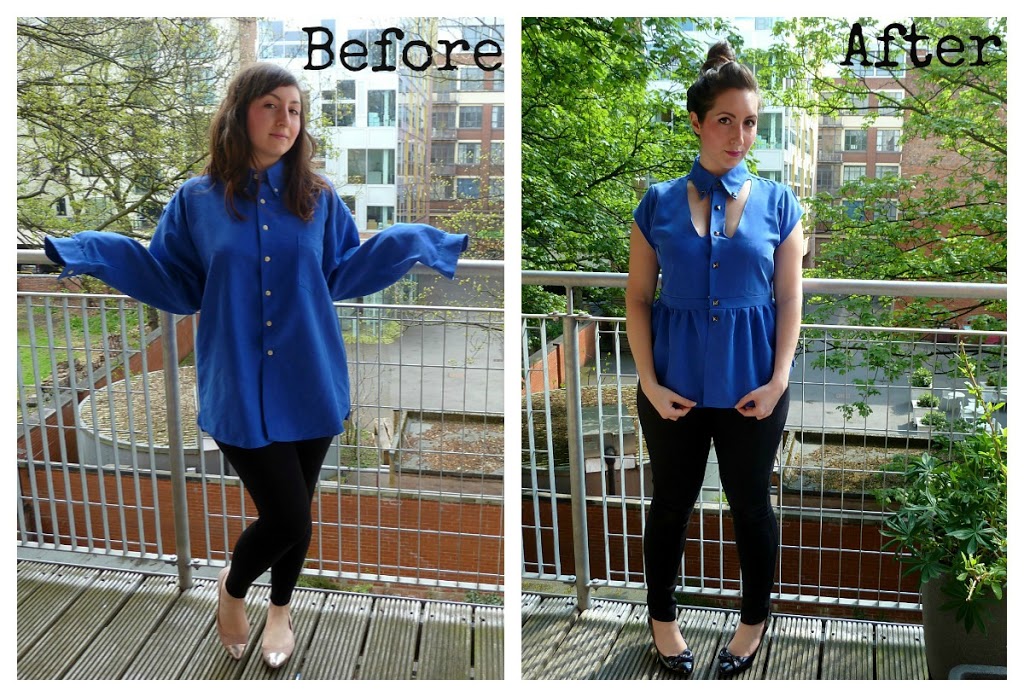
I got extra lucky because my item – a rather large men’s shirt – had a lovely drape to it (polyester that felt like rayon) and was electric blue (one of my favourite colours since a little girl)! So it didn’t take long for inspiration to come – in fact I had so many ideas that I had to create a Pinterest board for them all!
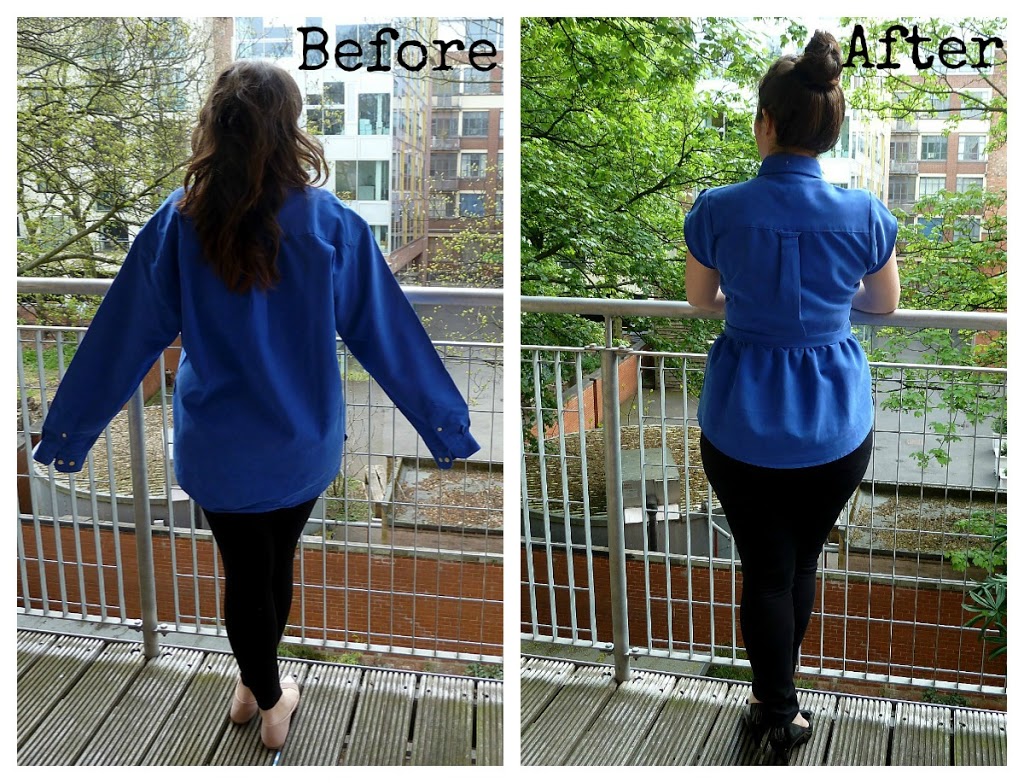
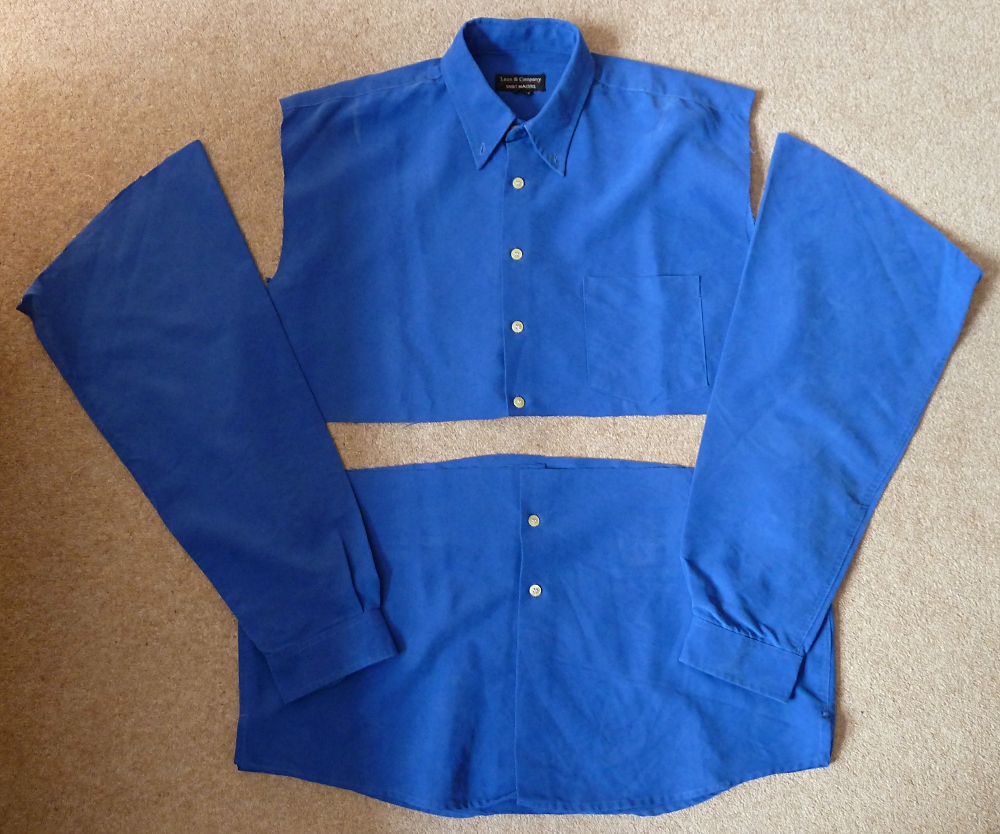
To begin, I started by creating a more flattering and girly silhouette, an idea I ‘borrowed’ from Liz, fellow participant and seasoned refashioner. So, I cut the sleeves off my shirt, removed the pocket and then cut the shirt in half, measuring to make sure that the ‘new’ bodice ended at my natural waistline.
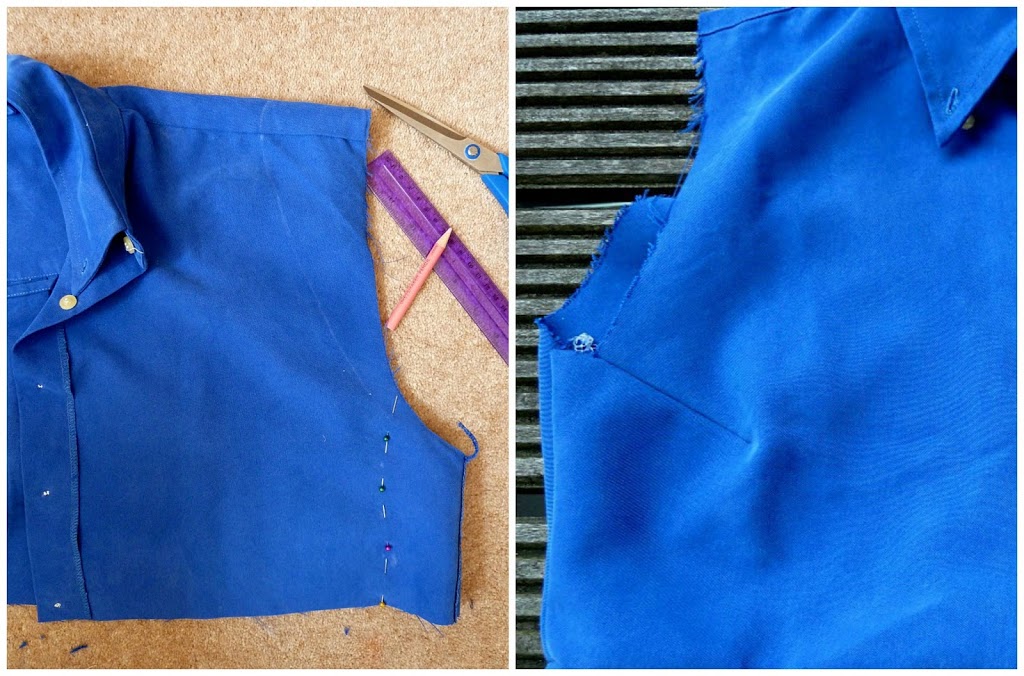
I then measured the length of my shoulder, marked it on the shirt and roughly sketched in a new armhole. I also pinned the side seams to get a nice snug fit. When I was happy with the fit I cut out the armhole and sewed up the side seams. Because the shirt was originally so big, I added in bust darts to counteract the baggy side boob effect. To make the darts I put the shirt on inside out, pinned the excess fabric into darts and then sewed them up.
For the waistband, I chopped off a strip from the bottom half of the shirt and took in the side seams so it measured the same as my new waist measurement. I then sewed the waistband to the bottom of my bodice, right sides together. Â Once I was happy with how my bodice fit, I gathered the upper edges of the bottom half to fit the bodice. I then sewed the gathered bottom half to the waistband, right sides together again. And the best thing is…this required no hemming at all! Yipeee!
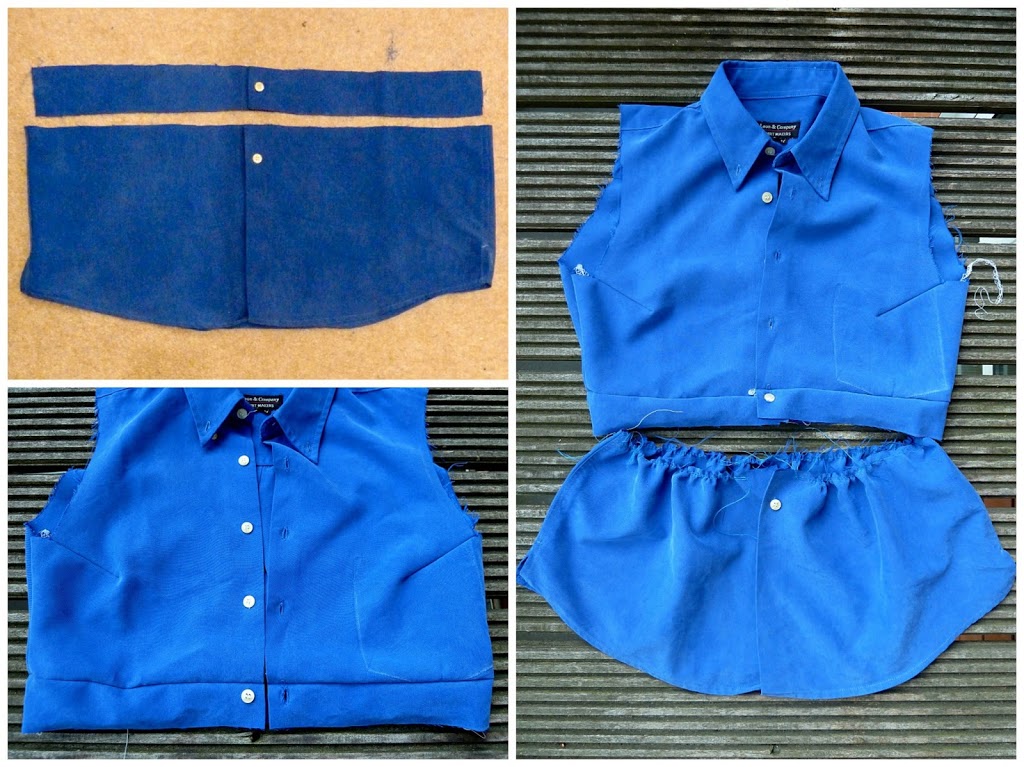
Now, you’re probably wondering why I still haven’t talked about the sleeves. Frankly, they’re an abomination! They caused me a lot of stress and in the end I cobbled them together randomly, so I’m not proud of or happy with them. At the stage of cutting the sleeves off, I really should have used one of my existing commercial patterns to shape the armholes…but I didn’t. I savagely hacked them instead (I blame the world’s brilliant refashioners who make it look so easy) and ended up with oddly shaped and massive armholes that the original sleeves were too small for. Disaster! So my advice to you is this:Â use a tried and tested pattern to shape your armholes and sleeve heads.
Anyway, my refashioning didn’t end there. Once I got the fit right I wanted to make my blouse a bit ‘edgy’, just for a change from the florals and chintz I’m usually attracted to. I started by covering my buttons with pyramid studs (bought here on ebay) using thistutorial by another fab refashioner and DIY blogger. I also added a couple studs to the collar – I just pushed the sharp rivets all the way through the fabric and pressed them closed tightly.Â
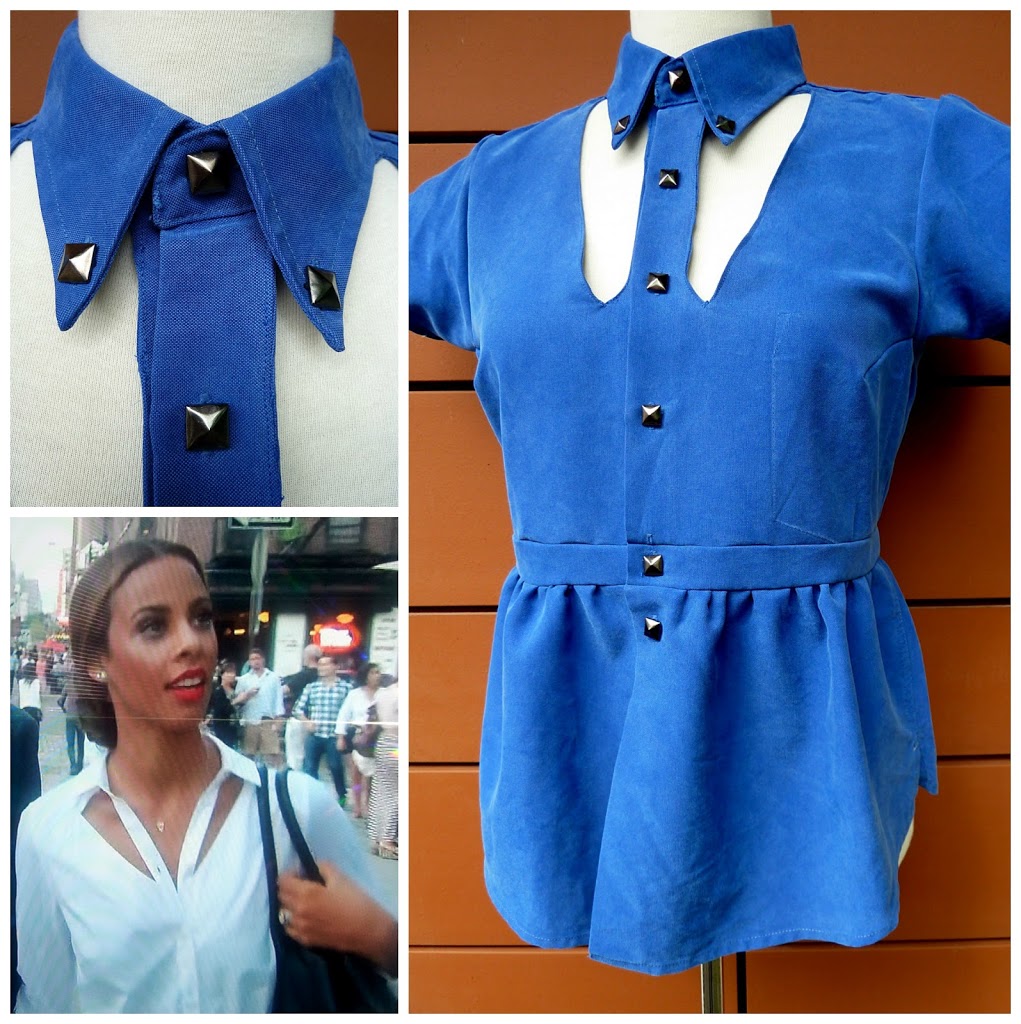
The finishing touch was the feature I knew I wanted from the very start of this journey: a cut-out! Inspiration hit when I was randomly flicking through channels and came across Rochelle from The Saturdays…of all people…wearing this cool blouse. And this is my take on it. I’ll tell you what! To make up for the lack of construction details on the sleeves, just stop by my blog tomorrow and I’ll share a step-by-step tutorial on the cut-out. Deal?
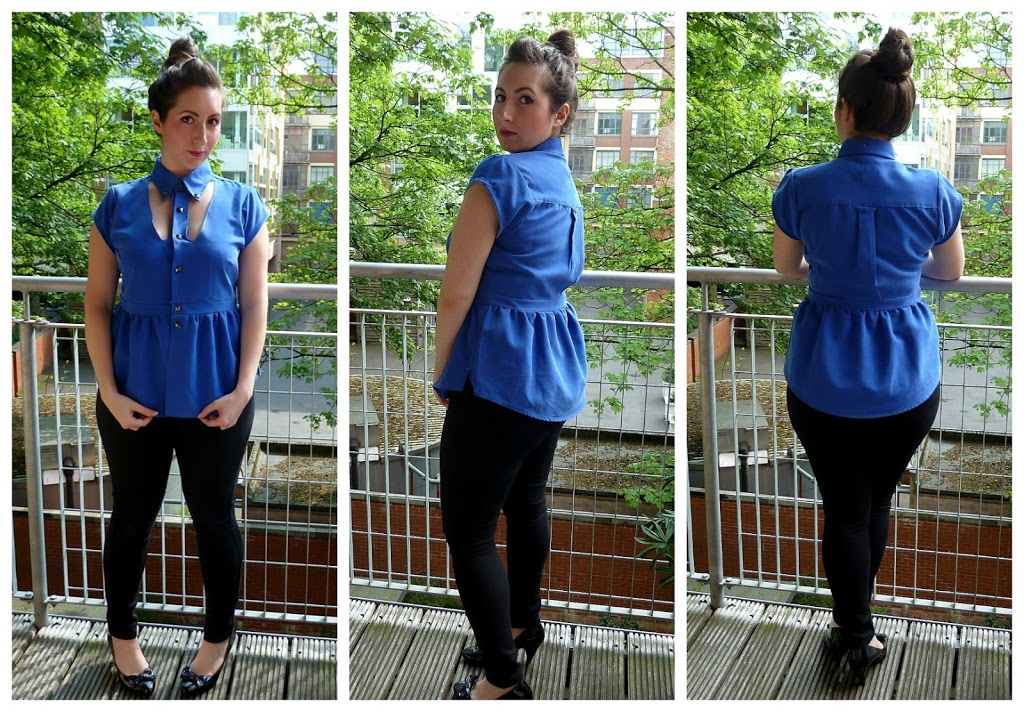
Anyway, sleeve drama aside, I am actually really pleased with the result! How do you think I did…considering I’m a newbie at refashioning?
Â
Thanks once again for this opportunity Portia, it’s been a wonderful experience and I’m definitely feeling more confident about tackling more refashions in the future!!!
Marie of A Stitching Odyssey
What a way to turn something “blokey” and baggy into something feminine and edgy! I love how flattering the fit is on Marie and the way she’s combined inspiration from 3 different sources.
Marie has already hit the nail on the head when it comes to the stand out qualities of the base garment. I knew right off that this colour would look amazing on Marie (I had no idea it was her favourite colour when she was a little girl!). The second quality was the feel/drape of the fabric. You may notice a little bit of a theme building here. So far we’ve had 3 mens shirts.(Here and here). 3 very different refashions. BUT, all with things in common. All with redeeming qualities in the base garment. 1.Great colour/pattern 2.Quality and/or quantity of fabric. (If you can get both these things in a base garment, that’s a great starting point for a refashion!)
I can’t wait to see the tute for the cut out part Marie!
Â